Custom Domain
Connect your own domain to your Capacity project and make it accessible at your branded URL.
Overview
Custom domains allow you to serve your Capacity project from your own domain (e.g., myproject.com) instead of the default Capacity subdomain. This gives your project a professional appearance and helps with SEO and branding.
Prerequisites
- A domain that you own
- Access to your domain's DNS settings
- A published Capacity project (see Step 1 below)
Step 1: Publish Your App
Before you can connect a custom domain, you must first publish your app:
- Publish your project
- Navigate to your project dashboard
- Click the "Publish" button in the top right corner
- Wait for the deployment to complete
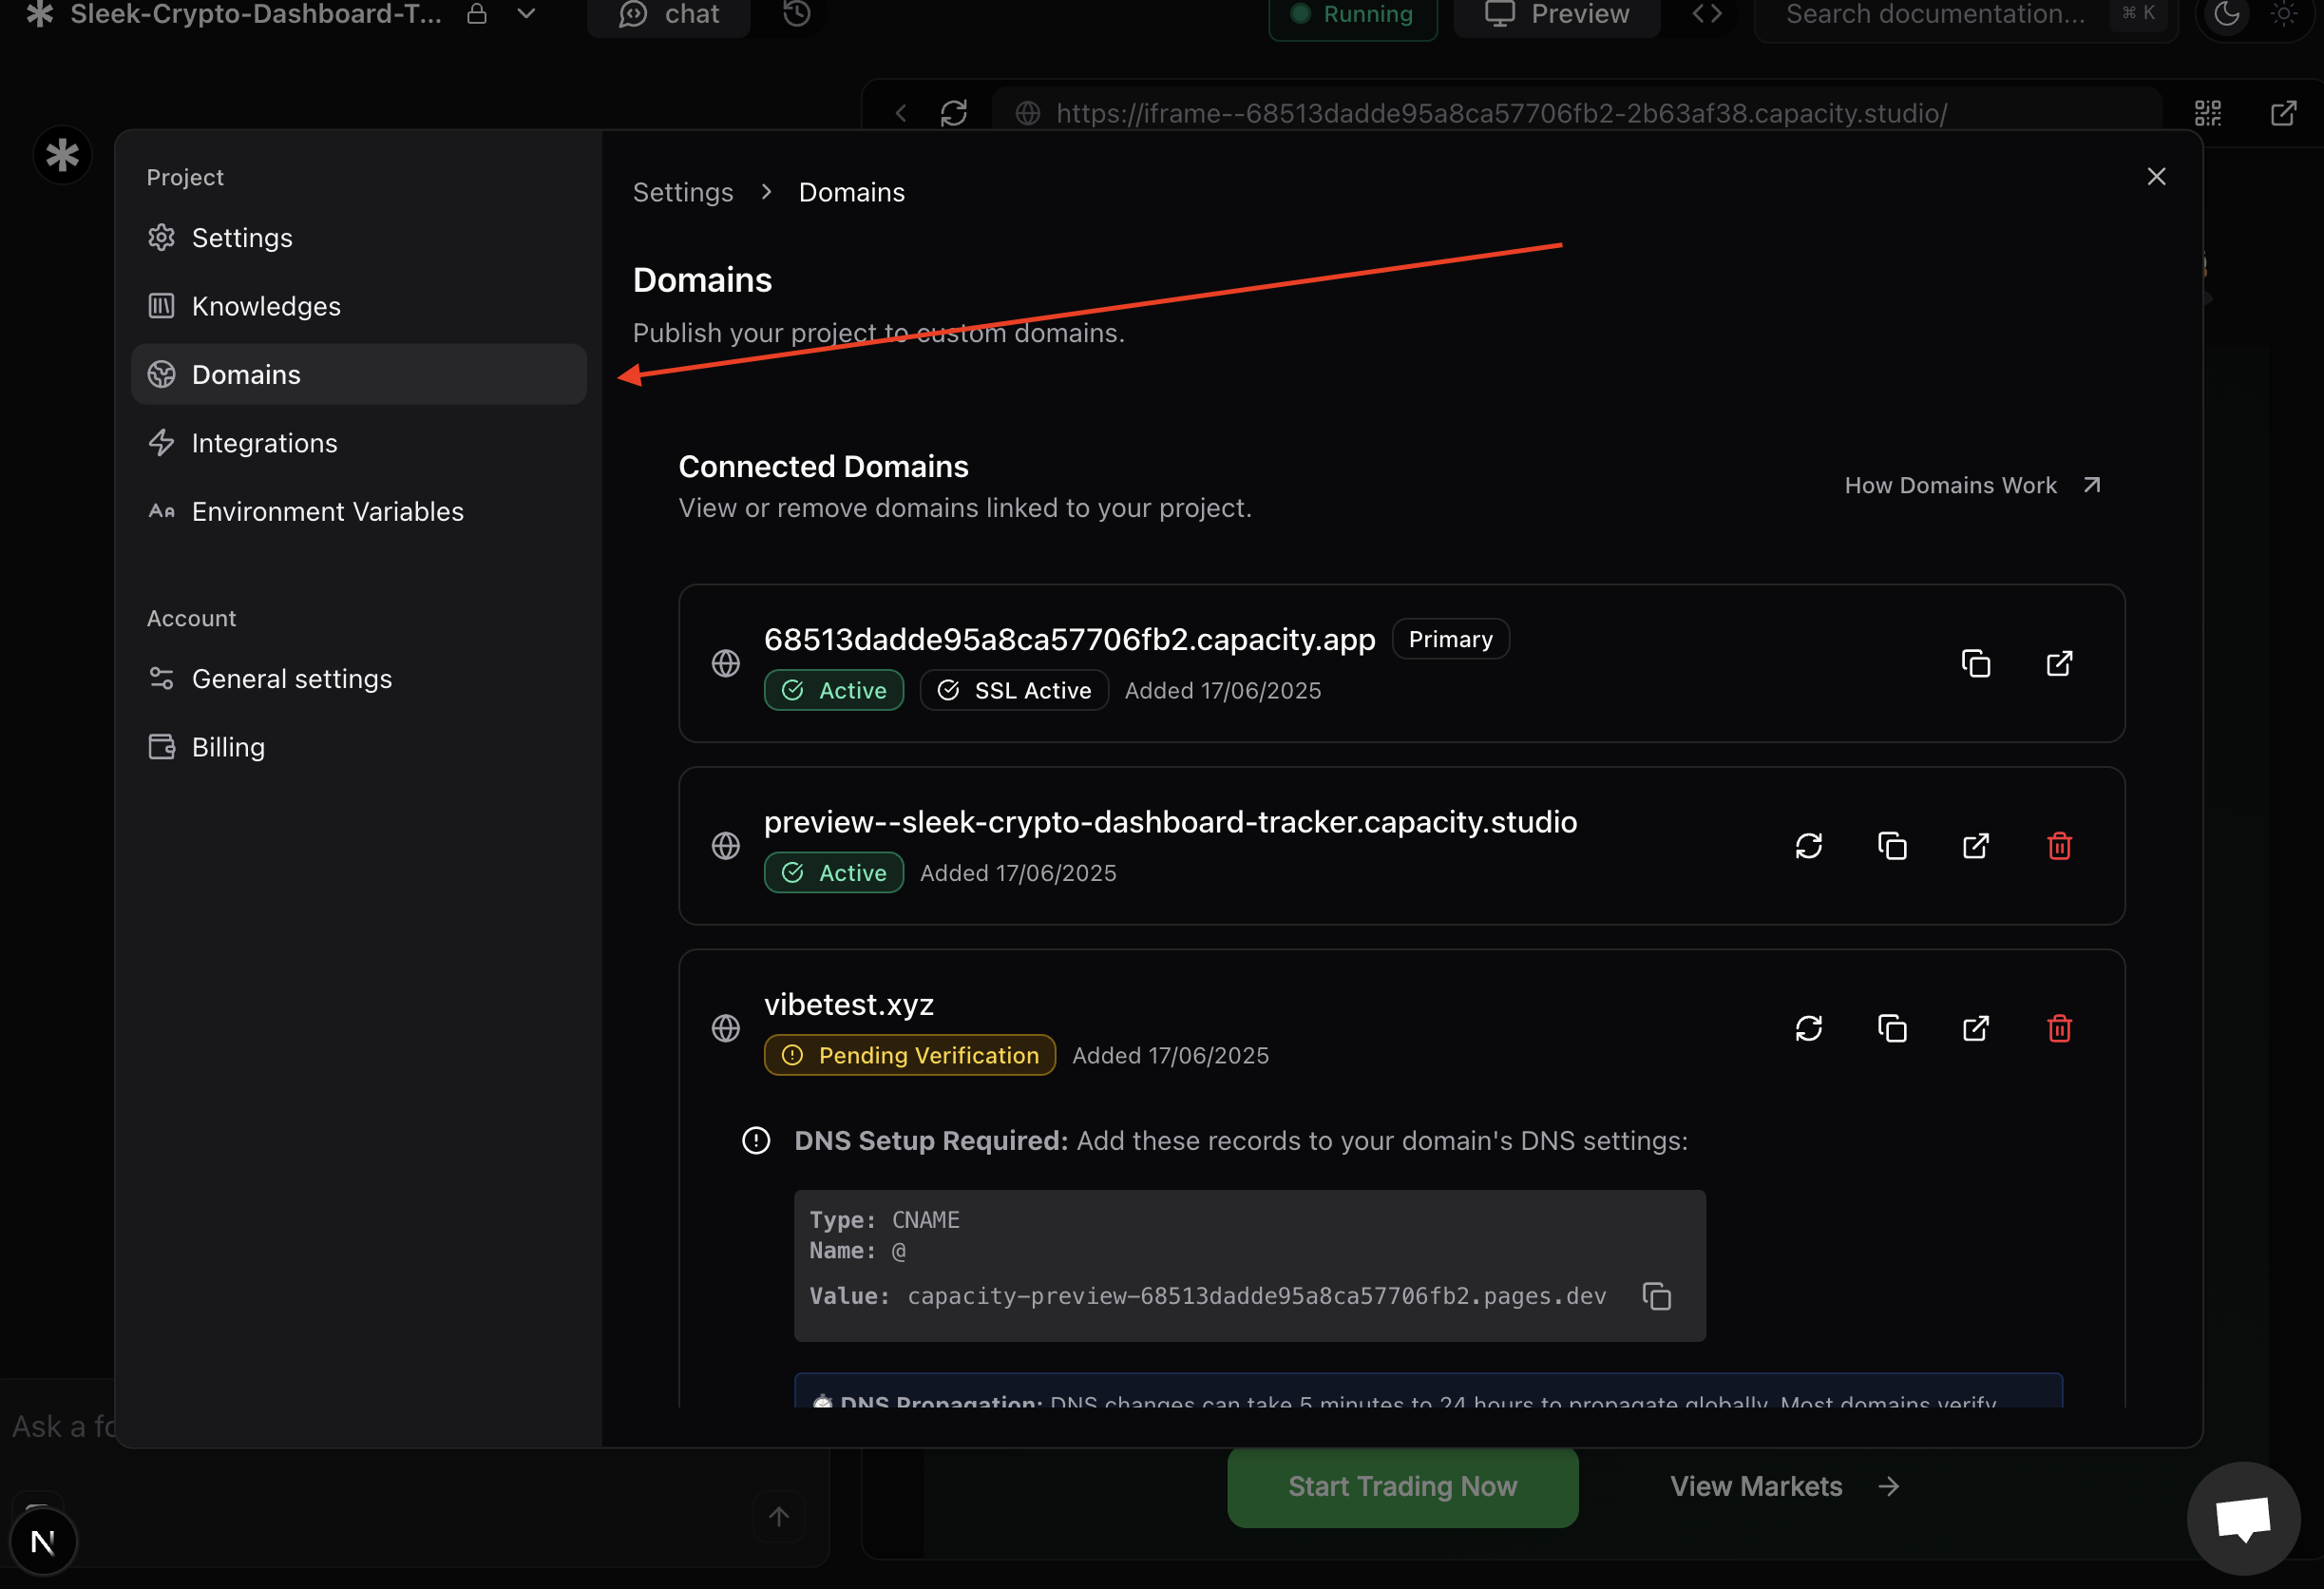
Step 2: Add Your Domain in Capacity
- Open your project settings
-
After publishing, click the "Settings" button in the top right
-
Select "Domains" from the sidebar
-
-
Add your domain
- In the "Add Existing Domain" section, enter your domain name
- Click "Connect Domain"
- You'll see your domain listed with a "Pending Verification" status
-
Copy your DNS records
- Expand the DNS setup section for your domain
- Copy the CNAME record details shown
Step 3: Configure DNS with Your Provider
Choose your domain provider below for specific instructions:
GoDaddy
-
Access DNS Management
- Log into your GoDaddy account
- Go to "My Products" → "All Products and Services"
- Find your domain and click "DNS"
-
Add CNAME Record
- Click "Add" to create a new record
- Select "CNAME" as the type
- Name: Use the name from your Capacity DNS instructions (usually
@for root domain orwwwfor subdomain) - Value: Paste the value from your Capacity DNS instructions
- TTL: Set to 1 hour (3600 seconds)
- Click "Save"
Namecheap
-
Access Advanced DNS
- Log into Namecheap
- Navigate to "Domain List" → Select your domain
- Click "Advanced DNS" tab
-
Add CNAME Record
- Click "Add New Record"
- Type: CNAME
- Host: Use the host from your Capacity instructions (
@,www, or subdomain) - Value: Paste the target from Capacity
- TTL: Automatic or 1 hour
- Click "Save All Changes"
Cloudflare
-
Access DNS Settings
- Log into Cloudflare
- Select your domain
- Go to "DNS" → "Records"
-
Add CNAME Record
- Click "Add record"
- Type: CNAME
- Name: Enter the name from your Capacity instructions
- Target: Paste the value from Capacity
- Proxy status: Can be either "Proxied" or "DNS only"
- TTL: Auto
- Click "Save"
Google Domains (Squarespace)
-
Access DNS Settings
- Log into your Google Domains account (now Squarespace)
- Select your domain
- Click "DNS" in the left sidebar
-
Add Custom Record
- Scroll to "Custom resource records"
- Name: Enter the subdomain or
@for root - Type: CNAME
- TTL: 3600
- Data: Paste the target from Capacity
- Click "Add"
Porkbun
-
Access DNS Settings
- Log into Porkbun
- Go to "Account" → "Domain Management"
- Click "Details" next to your domain
-
Add CNAME Record
- In the DNS Records section, click "Add"
- Type: CNAME
- Subdomain: Enter the subdomain or leave blank for root
- Answer: Paste the value from Capacity
- TTL: 600
- Click "Add"
Hover
-
Access DNS Settings
- Log into Hover
- Click on your domain name
- Go to the "DNS" tab
-
Add CNAME Record
- Click "Add New"
- Type: CNAME
- Hostname: Enter the subdomain part
- Target Host: Paste the value from Capacity
- Click "Add Record"
Other Providers
The general process for any DNS provider is:
- Find DNS Management: Look for "DNS," "DNS Management," "Name Servers," or "Advanced DNS"
- Add CNAME Record: Create a new CNAME record with:
- Name/Host: From your Capacity instructions
- Value/Target: From your Capacity instructions
- TTL: 3600 (1 hour) or automatic
Step 4: Wait for Verification
DNS Propagation Time
- Minimum: 5-15 minutes
- Typical: 30 minutes to 2 hours
- Maximum: Up to 24-48 hours
What Happens During Verification
- DNS Propagation: Your DNS changes spread across the internet
- Capacity Detection: Our system automatically detects your DNS records
- SSL Certificate: We automatically provision a free SSL certificate
- Domain Activation: Your domain becomes active and secure
Checking Status
- Your domain status will automatically update in the Capacity dashboard
- You can manually refresh the status using the refresh button
- You'll see the status change from "Pending Verification" to "Active"
Step 5: Test Your Domain
Once your domain shows "Active" status:
- Visit your domain in a browser
- Verify HTTPS - Your site should load with a secure connection
- Test all pages - Navigate through your project to ensure everything works
Troubleshooting
Common Issues
Domain stays "Pending" for hours
- Double-check your CNAME record values
- Ensure there are no typos in the DNS configuration
- Some providers take longer to propagate changes
"DNS_RECORD_NOT_FOUND" error
- Verify the CNAME record was saved correctly
- Check if you need to remove any existing A records for the same subdomain
- Wait longer for DNS propagation
SSL certificate issues
- SSL certificates are provisioned automatically after DNS verification
- This usually takes 1-5 minutes after DNS verification completes
- Contact support if SSL remains "Pending" for over 30 minutes
Domain works but shows "Not Secure"
- This means the SSL certificate is still being provisioned
- Wait a few more minutes and refresh the page
- Clear your browser cache if the issue persists
Getting Help
If you're still having trouble:
- Check our status page for any ongoing issues
- Join our Discord community for peer support
- Contact support with:
- Your domain name
- Screenshots of your DNS settings
- The exact error message you're seeing
Best Practices
Domain Selection
- Use www or non-www consistently - Pick one and stick with it
- Consider SEO implications - Choose the version you want to rank in search engines
- Plan for email - Ensure your domain configuration doesn't conflict with email services
DNS Management
- Keep TTL reasonable - 1 hour (3600 seconds) is usually perfect
- Document your changes - Keep track of what DNS records you've added
- Test from multiple locations - DNS propagation can vary by geographic location
Security
- HTTPS is automatic - All custom domains get free SSL certificates
- Certificate renewal - SSL certificates auto-renew, no action needed
- Mixed content - Ensure all resources load over HTTPS
Advanced Configuration
Apex Domain (example.com)
Some providers don't support CNAME records for apex domains. In these cases:
- Use a subdomain (www.example.com) instead
- Set up a redirect from apex to www
- Or use your provider's alias/ANAME feature if available
Multiple Domains
You can connect multiple domains to the same project:
- Add each domain separately in your Capacity dashboard
- Configure DNS for each domain
- One domain can be set as "primary" for SEO purposes
Subdomains
Connect subdomains like blog.example.com:
- Add the full subdomain in Capacity
- Create a CNAME record for the subdomain portion
- Point it to your Capacity project
Pricing
- Custom domains require a paying plan for all Capacity projects
- SSL certificates are automatically managed
Need help? Join our Discord community.